
IMS Company
A trusted partner for the plastics processing industry, offering a wide range of high-quality, process improving products at competitive prices. We are a diversified distributor specializing in supplies, components, auxiliary machinery, and equipment. With 75 years of industry experience, our stocked warehouse ensures fast, reliable delivery, helping you maintain peak production efficiency. Whether you need innovative products, expert support, or tailored solutions, IMS Company has the expertise and resources to keep your operations running smoothly. Visit us at imscompany.com for more!


For 75 years, one thing has never changed at IMS — our single-minded focus on providing products and services designed to help your shop increase efficiency and ramp up productivity.
Check out IMS on YouTube!
Blogs
July 28, 2025 – Why Keiba Gate Cutters Excel in Precision Cutting
June 3, 2025 – Sizing a Desiccant Dryer for Plastic Injection Molding
May 7, 2025 – Mold Cleaners
January 7, 2025 – Time to Purge
November 4, 2024 – Plant Shutdown
October 22, 2024 – Prepare Your Shop for Winter
September 11, 2024 – New Injection Press Setup
August 26, 2024 – D-limonene
August 14, 2024 – Mold Rust Prevention
July 9, 2024 – Mold Cleaner vs. Mold Release
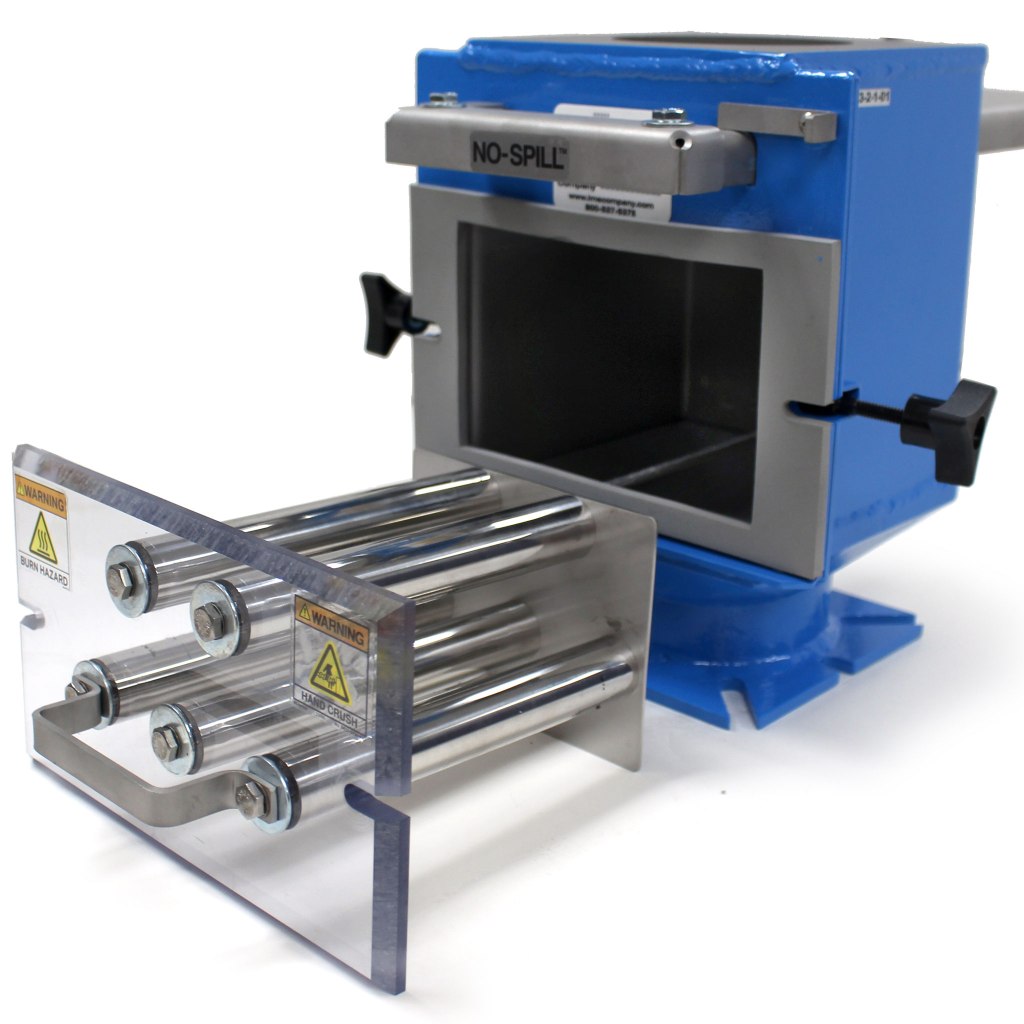
March 25, 2024 – Part Diverting Systems
March 13, 2024 – Chill Out
February 22, 2024 – Why is Moisture a Problem
February 19, 2024 – What is a Vacuum Loader
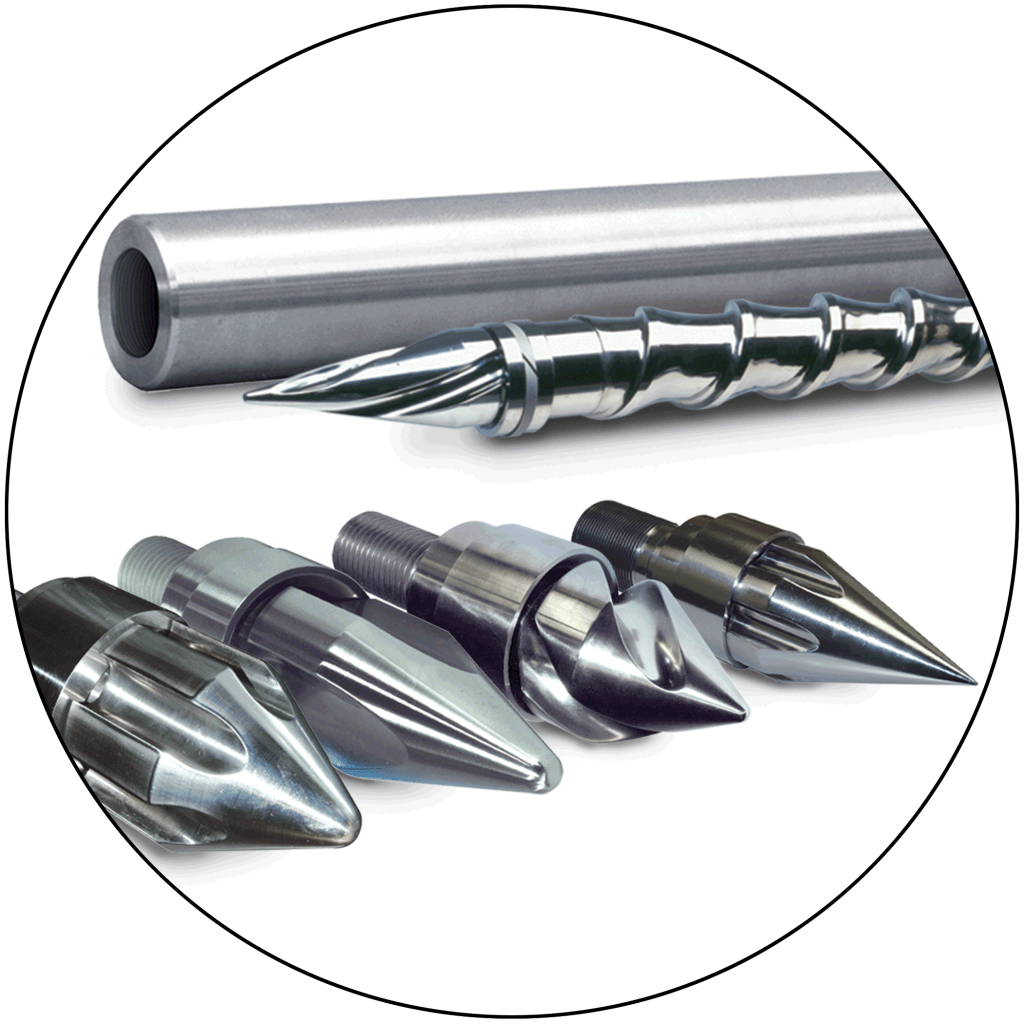
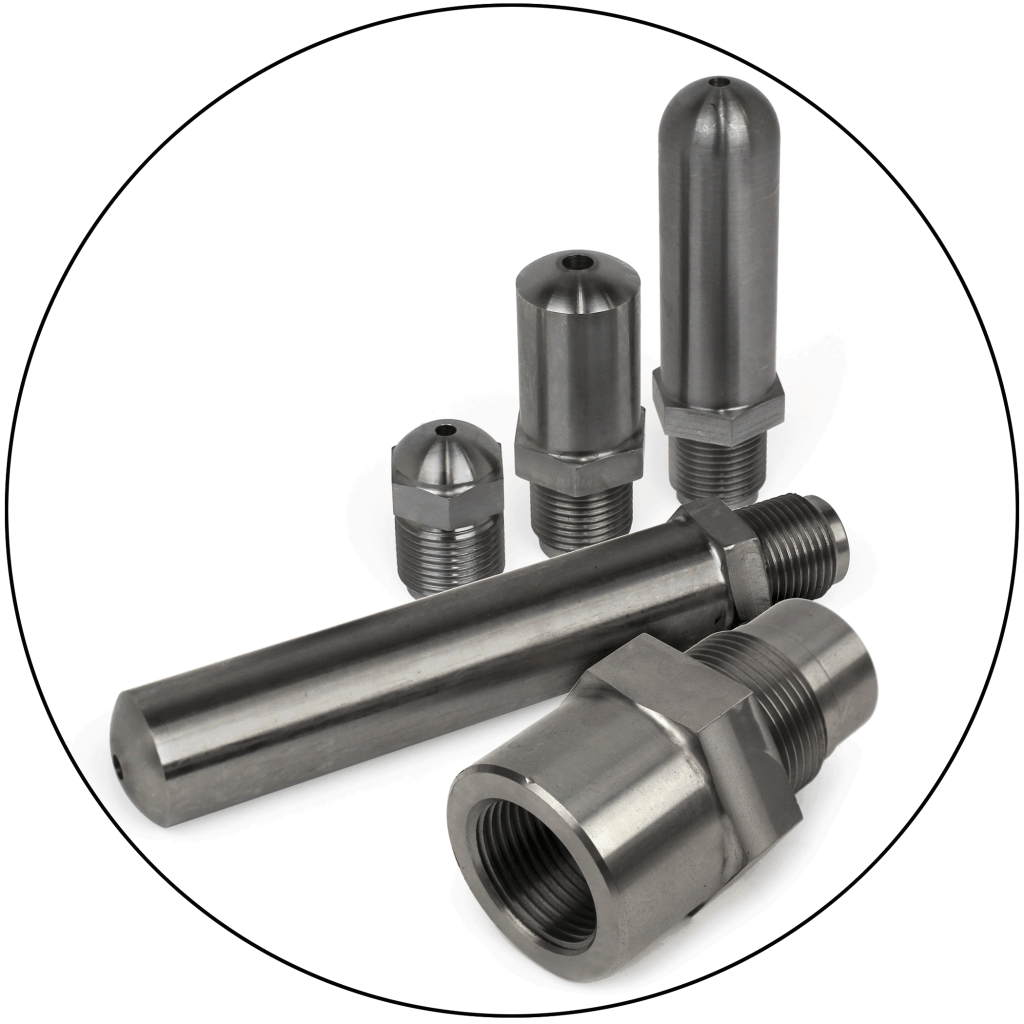
February 5, 2024 – Injection Molding Nozzle Tips
January 29, 2024 – Metal Separation
May 30, 2023 – Benefits of Insulation
April 22, 2023 – Sustainability
March 20, 2023 – Dew Point Meter/Monitor
March 2, 2023 – IMS Lime Buster
March 1, 2023 – IMS Brody Ring
January 30, 2023 – Clean Room Manufacturing
January 1, 2023 – Heater Band Wiring
December 21, 2022 – IMS Select Drum Tumbler
December 8, 2022 – Plastic Granulators
December 6, 2022 – Mold Setup Cart
November 28, 2022 – Eliminate Static and Dust
November 18, 2022 – Extending the Life of Your Heater Band
November 2, 2022 – How to Set Barrel Zone Temps
September 9, 2022 – The Benefits of Extruder Screens
August 24, 2022 – Calculating Heat Load for a Circuit
August 17, 2022 – Purgex Purging Compounds
August 12, 2022 – Air Wipe
August 11, 2022 – IMS Custom Projects
August 4, 2022 – New Shini Hopper Loader Systems
July 21, 2022 – Quick Change Fittings – Thread Profile Sizing
July 19, 2022 – IMS Custom Project
June 20, 2022 – Safety First
June 15, 2022 – IMS Screw Tip Brody Ring
June 15, 2022 – Screw Material Guidelines
June 15, 2022 – Screw Tip Wear Issues
June 15, 2022 – Essential Barrel Information
June 9, 2022 – Mold Safety Checklist
June 2, 2022 – Why Choose High Quality Desiccant?
May 26, 2022 – Circulators 101
May 19, 2022 – Sizing a Chiller
April 25, 2022 – Mold Temperature Control Product Selection
April 19, 2022 – Selecting the Right Gate Cutter For Your Job
April 12, 2022 – Barrel Insulation Blankets
April 4, 2022 – Quick Mold Change
March 14, 2022 – Spiral Technology
February 17, 2022 – Screw Tips


-
Circulators 101

March 6, 2024
Circulators (Thermolators, Temperature Controllers) are essential components in injection molding processes, primarily utilized for controlling the temperature of molds so that as the part cools after injection, it maintains dimension, shape and structure – ensuring consistent quality and efficiency. Controlling the mold temperature is critical to good parts. You can get good melt flow, and the cavity can fill quickly and fully, but if the part is not cooled properly then a good melt flow means nothing.
Circulators need to be compatible with the injection molding machinery and seamlessly integrated into the overall manufacturing setup for efficient operation. Regular maintenance and monitoring of circulators are essential to ensure they continue to function optimally, thereby avoiding downtime and production delays. In advanced setups, circulators may be integrated into the overall automation system of the injection molding process, allowing for real-time monitoring and control of temperature parameters.

Here’s how circulators are typically used in injection molding:
- Cooling: Cools the molds after each cycle. Rapid cooling is essential for improving cycle times and overall productivity.
- Heating: In some cases, circulators may also be used for heating the molds to specific temperatures.
- Thermal Stability: Ensure thermal stability throughout the injection molding process, which is crucial for preventing defects and maintaining part quality.
- Energy Efficiency: Modern circulators often come with energy-saving features to optimize energy consumption during the temperature control process, contributing to cost-effectiveness and sustainability.
- Process Optimization: By precisely controlling the temperature of molds, circulators play a vital role in optimizing the process for different materials and product specifications.
Overall, circulators play a critical role in maintaining temperature control and ensuring the quality, efficiency, and reliability of injection molding operations. Their proper selection, installation, and maintenance are essential considerations for any injection molding facility.
IMS offers several options for temperature control needs: Circulators, Mold Temperature Controllers
You May Also Need:
Heat Transfer Fluids
A Quick Comparison Of Heat Transfer Mediums
• Water — Limited use range: 32° to 212°F. Encourages corrosion.
• Uninhibited Glycols — Allow temperatures to 250°F, but 2½ times more corrosive than water, if not neutralized.
• Automotive antifreeze — Contains corrosion inhibitors, but can foul heat transfer surfaces in less turbulent systems.
• UG-10 Ethylene Glycol — Low silicate formula provides good corrosion protection at a relatively low price.
• EG-17 Ethylene Glycol — Industrial inhibitors coat surfaces and impact pH for maximum corrosion protection.
• Pro-17 Inhibited Propylene Glycol — Non-Toxic Heat Transfer Fluid With Maximum Protection Against Acidity and Corrosion.
• PG-1 Hi-Heat Transfer Fluid — The Ultimate, Non-Toxic Fluid For Non-Pressurized Heating To 600°F.
• FF-1 Oil System Flushing Fluid — Improves heat transfer for faster cycles.
• PSC Plus Oil System Cleaner — Maximizes heat transfer for more parts and increased quality.
In addition, how efficiently any of the above units work is directly tied to how clean your mold passages are. Any buildup of scale can affect the transfer of heat. The passages need to be checked and maintained regularly. To help with that, IMS offers the Limebuster which helps remove the scale buildup in mold passages. Just 1/64″ of scale can reduce the heat transfer rate up to 40%. Using an acid/water mixture, the fluid is circulated by a low pressure pump. The fluid helps dissolve the scale slowly so good heat transfer can return. This type of unit also is used to clean heat exchangers.
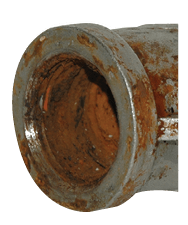
Before 
After 
While the above is basic in its presentation, the message is clear; IMS understands and can help. IMS has the expertise and the equipment to help maintain and even improve your process. Good parts and reduced scrap means you make money.
That is what we are here to help with. Call IMS Today for all your Injection Molding needs.


-
Spiral Technology
Cut Cycle Time – Mold Better Parts
IMS Select Exclusive Spiral™ End Caps, Screw Tips,
R-Screws and Hoppers will help you do both!Logarithmic spiral curves promote a faster, freer flow of material than conventional, flat tapers. A smoother, unencumbered flow produces better parts. These facts are why IMS incorporates spiral curves in each component of it’s exclusive SPIRAL™ System. The following is a brief history of how the IMS SPIRAL™ System developed.

Watch this 30 second video to see how much faster material
passes through the Spiral (right) versus Conical (left) Hopper.The introduction of electronic process controls back in the early 1980’s was without a doubt a technological breakthrough. For a lot of OTHER industries this was a huge step forward. For the injection molding industry, however, IMS questioned the logic of trying to computerize a process so full of variables and lacking in standardization.
Prior to process controls, IMS had developed numerous individual products aimed specifically at improving part quality. Full Taper Nozzles and Screw Tip BRODY-Rings® are just a couple of examples. Each addressed a specific need and they all remain solid, successful products. It was the emergence of process control, however, that really started us thinking about the injection process as a whole (both the machinery and the material) and what could and should be changed in order to mold better parts.

It was already a proven fact that the current, restrictive R-Screw Process was stretching and deforming the molecular bonds of our plastics and seriously affecting finished part strength. We needed to find ways to get the plastic from the hopper to the mold with the least amount of damage possible. We found that this problem could be solved, in large part, by the replacement of all standard, flat internal tapers with smoother, gentler, logarithmic spiral curves.

The more gradual compressing of the material, plus the resulting coanda effect (that is, the phenomenon of material flow tending to follow closely along the wall contour of a passage), greatly eased the strain on the plastic’s molecules and the effects on the material’s inherent properties.
A. In 1986, IMS first used this technology in the development of their revolutionary Spiral™ End Caps. The results, as projected, were impressive. Parts were stronger and more dimensionally stable. Older presses equipped with these new end caps were actually producing higher quality parts than new presses with traditional style caps.

Spiral™ End Cap 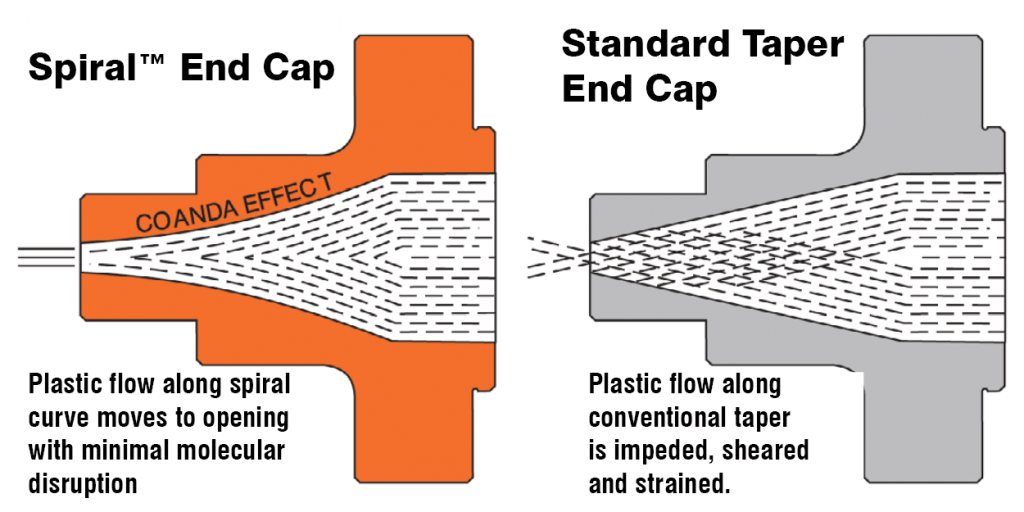
Spiral-Passage Barrel End Caps Coalesce The Melt
Without Damage to the Molecular Structure.B. Next IMS focused its attention on the Screw Tip. Their existing melt valves with narrow sliding ring and anti-blow- by BRODY-Ring® seal were already proven effective at maintaining shot control. But it was the development, in 1988, of a unique, Spiral™ front end that made IMS Spiral™ Screw Tips the least restrictive tips ever produced. The reduction of strains, flow lines and shear-induced heat in the melt improved part strength and quality significantly.
Another innovation was the introduction of the Thermally Compensated R-Screw. Research showed that installation of a heat tube in the front end of the screw would effectively transfer excess heat from the compression zone back to the transition zone, where it could be reused to assist in the melting of incoming pellets. Screw wear from unmelted pellets was dramatically reduced and the ability to turn down front end heat had a direct and positive effect on cycle time, part quality and reject rate.
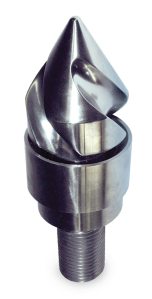
Easy-Flow (Spiral-Discharge) Screw Tips with Brody-Ring®
Advance the Melt Without Strains or Shelter HeatC. Next step, the feed hopper. No matter what their diameter or height, they all had the same straight taper to the machine intake. At least that’s the way it was prior to 1988. Consequently, they were all prone to bridging and surging. There wasn’t a single OEM feed hopper that could guarantee consistent, even feeding of the pellets to the screw. IMS found that a logarithmic Spiral Curve in place of the straight taper produced astounding results. Tests showed that whether the material was virgin or regrind, or whether the hopper was full or nearly empty, all the material moved all the time in a steady downward flow. Hence, IMS Spiral™ Hopper was born. Their effect on part weight, part dimensions, and overall part consistency, not to mention the flowability of most stubborn materials, is remarkable.

D. Finally IMS Spiral Technology was applied to the screw – more specifically, the screw flights. With IMS Spiral™ R-Screws:
- Pellets move forward in a more controlled, gentle tumble.
- Pellets begin melting sooner and proceed in a far more efficient and orderly manner.
- Pressure is provided by the lateral movement of the screw (as it should be) – NOT by the compressing of the material by the screw flights, as is the case with all existing injection screws.
Nearly 30 years since the introduction of the reciprocating screw, the IMS Spiral™ R-Screw was the First and Only screw developed expressly to reduce molded-in stress and strain. Research has revealed the injection machine doesn’t work as hard and produces more consistent quality parts.
IMS Exclusive Spiral™ Retrofit Components can improve the IMS Exclusive Spiral™ Retrofit Components can improve the performance of any injection press regardless of age, make, or model. They can also significantly increase your bottom line. Inquire today for more information!
When a Spiral Hopper is Likely a Better Choice
You should strongly consider a Spiral Hopper if:
- You run mixed batches or often operate with hopper partly full (versus maintaining full inventory).
- Materials are challenging: regrind, irregular shapes, high moisture sensitivity, etc.
- Your quality control is tight: need shot-to-shot consistency, minimal defects from pellet feeding issues.
- Productivity is critical, and cycle times are being impacted by material feed inconsistencies.
- You’re willing to invest a bit more up front for better performance and less downstream defects / maintenance.
When Conical Hopper Might Be Enough (or Preferable)
- If you run with hopper nearly always full, with flowable, “easy” materials.
- When initial cost or capital constraints are tight.
- Simpler operations where the benefit from Spiral design won’t offset the cost.
- If you have existing equipment and retrofitting or replacing hoppers is difficult or costly.
-
Why Keiba Gate Cutters Excel in Precision Cutting
Perfecting the Balance of Strength and Thickness
IMS Company is your trusted source for a variety of Gate Cutters to fit your needs and we are excited to add to our catalog Keiba Gate Cutters!
A gate is a small opening that connects the runner (where molten plastic flows) to the mold cavity. After the part is molded and ejected, there’s usually a small nub or protrusion of plastic at the gate location. A gate cutter is essential in post-processing of injection molded parts to remove the small leftover plastic at the gate and ensure the finished product is within spec.
What makes Keiba cutters unique?
Recently, IMS staff sat down with Gerard Verdino, former Director of Keiba US, to discuss what makes Keiba Gate Cutters so special. Below is a summary of his 4 Key Points of what makes Keiba Gate Cutters unique.
- Keiba has perfected the balance of strength and thickness. With Keiba’s Thin-Blade Technology, the blades cut the plastic rather than pushing it apart, making for a more perfect cut. This reduces stress on the operator and the finished part. The technology works so well that Keiba has not needed to change their design for the last 25 years.
- Keiba cutters are crafted with a full blade cutting edge that goes all the way to the base of the hinge. “Most cutting is done naturally at the base so it’s really important to not have that gap at the base of the blade.”


- Every single cutter is individually hand-inspected and adjusted before shipping to the customer. Quality Control Inspectors check that the blades align precisely with no gap. Inspectors then test the cutting performance to ensure that every cutter delivers consistent quality out of the package. No adjustment required!
- A subtle, precise blade bevel prevents the hinge from loosening and maintains the blade alignment for the life of the cutter. “Very few manufacturers are aware of this point but it’s very important and very difficult to engineer into every single cutter. The lower hinge has got to come above the upper hinge.”

-
How to Size a Desiccant Dryer for Plastic Injection Molding
What is the material? How many pounds per hour do you want to process?
Properly drying plastic resin is essential to achieving high-quality molded parts, especially for hygroscopic materials such as nylon, PET, or polycarbonate. At IMS Company, we offer Dri-Air desiccant dryers engineered for efficiency, reliability, and precision.
One of the most common questions we hear is: How do I size the right dryer for my process?
1. Know Your Material and Throughput
Before you can select the correct dryer, you must answer two critical questions:
- What material are you drying?
- How many pounds per hour will you be processing?
Each plastic resin has its own recommended drying time and drying temperature. You can usually find these values in your material supplier’s technical datasheet. These specs are the foundation for dryer and hopper selection.
2. Dryer Sizing Rule of Thumb
A general guideline when selecting a dryer is: 1 CFM of process air per pound of material per hour. For example, if you are processing 25 pounds of nylon per hour, you’ll need a dryer capable of delivering 25 CFM of dry air.
3. Hopper Sizing Rule of Thumb
The drying hopper needs to be sized so that the material spends the full recommended drying time in the hopper before reaching the feed throat.
Hopper Size (lbs) = Drying Time (hrs) × Throughput (lbs/hr). Example: If your material requires 3 hours of drying time and you process 25 lbs/hr, then:
- Dryer blower: 25 CFM
- Drying hopper: 75 lbs
This ensures every pellet gets the full 3 hours of exposure to dry air, resulting in fully conditioned material when it reaches your screw.
4. Dryer Configurations
IMS/Dri-Air offers several desiccant dryer configurations to suit your floorplan and process needs:
- Machine-mounted dryers – Best for smaller applications with limited space.
- Floor-mounted dryers – Ideal when space is available and you need a dedicated drying station next to the press or extruder.
- Portable dryers – Designed for flexibility—move them from machine to machine as needed.
Refer to catalog page 686, (or your printed IMS catalog) for hopper sizes, mounting options, and blower capacities.
5. Why IMS/Dri-Air Dryers Save You Money
What makes IMS/Dri-Air dryers different? Efficiency.
Our dryers regenerate the desiccant beds using dry process air, not ambient air. This allows the heaters to operate only when regeneration is necessary—not on a fixed timer. This is controlled by thermocouples embedded in the beds.
Benefits include:
- Shorter heater run-times
- Lower energy consumption
- Faster payback
Other systems use timers or ambient air, which wastes energy and leads to inconsistent results.
Additionally, bed switching is also based on temperature, not time. This approach eliminates dew point spikes and delivers stable drying performance, part after part.
6. Optional High-Temp Cooling
If you’re drying materials at or above 250°F, we recommend an after-hopper cooler. This ensures your material won’t be overheated before entering the machine and protects downstream components.
Final Thoughts
Proper dryer sizing is critical for material performance and processing consistency. IMS/Dri-Air desiccant dryers are engineered with energy savings, consistent drying, and operational flexibility in mind.
If you’re unsure which dryer suits your needs, contact our team—we’ll help size the perfect system for your material, throughput, and floor layout.


-
Mold Cleaners
In Injection Molding
1. Maintain Mold Integrity & Longevity

Residue from polymers, release agents, and contaminants can accumulate on mold surfaces. Mold cleaners help remove these, preventing wear and corrosion. Regular cleaning reduces costly mold repairs or replacements, preserving precision tooling.
2. Ensuring Product Quality
Contaminants on the mold can lead to defects such as blemishes, streaks, or parting line mismatches. A clean mold ensures that the parts produced meet tight tolerances without warping or deformation caused by residue interference.
3. Reducing Downtime
Clean molds reduce the frequency of stoppages caused by defects or ejection issues. Preventive cleaning reduces unplanned maintenance, ensuring continuous production and higher overall equipment effectiveness.
4. Improving Safety and Cleanliness
Using proper cleaners minimizes the release of harmful fumes or dust. Non-cleaned molds can have sharp burrs or sticky surfaces that pose safety risks to workers.
5. Compatibility with Various Materials
Modern mold cleaners are formulated to be compatible with different mold materials (e.g., steel, aluminum) and coatings, which ensures effective cleaning without damaging the mold.
Types of Mold Cleaners
1. Solvent-Based Mold Cleaners
- Use: Dissolves and removes grease, wax, silicones, and resin buildup.
- Example Products: IMS Mold Cleaner Red 2000
- Pros: Quick-drying, effective on tough contaminants.
- Cons: May be flammable or emit strong fumes—proper ventilation needed.
2. Non-Flammable Mold Cleaners
- Use: Ideal for environments where fire hazards are a concern.
- Example Products: IMS Mold Cleaner White 2000 and Economy Mold Cleaner NEW formula IMS Mold Cleaner White 25 Coming Soon!
- Pros: Safer to use near hot molds or in enclosed areas.
3. Citrus-Based or Bio-Based Mold Cleaners
- Use: Eco-friendly cleaning, often used for light to moderate residue.
- Example Products: IMS Citrus Spray, IMS SafeKlean Mold Cleaner, IMS Citrus 50 plus Mold Cleaner
- Pros: Lower toxicity, biodegradable.
- Cons: Less aggressive; not suitable for heavy buildup.
4. Foaming Mold Cleaners
- Use: Clings to vertical mold surfaces, allowing deeper penetration.
- Pros: Ideal for overhead or hard-to-reach mold areas.
- Example Products: IMS C-Foam Mold Cleaner
5. Dry Mold Cleaners / Air Dusters
- Use: Remove dry dust, plastic powder, or light debris.
- Pros: No drying time; safe for sensitive surfaces.
Cleaning Procedures
1. In-Press Cleaning (Quick Cleaning During Production)
Between short production runs or color/material changes.
- Steps:
- Open the mold.
- Spray solvent-based or non-flammable cleaner on the cavity/core.
- Wipe with lint-free cloth.
- Resume molding after full evaporation.
2. Offline Cleaning (Thorough Maintenance)
During scheduled downtime or mold changeovers.
- Steps:
- Remove the mold from the machine.
- Disassemble (if needed) for access to all surfaces.
- Clean with appropriate solvent or bio-based cleaner.
- Use soft brushes or non-metallic scrapers for buildup.
- Dry thoroughly and apply rust preventive (e.g., rust inhibitor spray).
3. Ultrasonic Cleaning (for Small, Intricate Molds)
Deep cleaning of complex geometries or tiny vents.
- Method: Place mold inserts in an ultrasonic tank with cleaning fluid. Cavitation removes residue without abrasion.
4. Dry Ice Blasting (Non-Abrasive Heavy Cleaning)
For removing heavy buildup without damaging surfaces.
- Method: CO₂ pellets are blasted onto mold surfaces. No secondary waste, no disassembly needed.
Best Practices
Apply rust inhibitors after cleaning to prevent corrosion. Clean while the mold is still warm (but not hot) to loosen residue. Always follow the chemical cleaner’s SDS (safety data sheet). Use proper PPE—gloves, safety glasses, and masks if needed.

-
New Product Coming Soon
IMS Company is finalizing a new non-flammable formula to replace White 2000 and Economy Mold Cleaners.
Final shipping date is August, 2025! Quantities may be limited – get your orders in now!White 2000 Replacement

Available in July!
IMS Company is excited to unveil our newest Mold Cleaner: White 25! This TCE free cleaner is nonflammable, fast drying and cleans without wiping.
Available now:
Alternatives to White 2000

Hydrocarbon-based Red 2000 Mold Cleaner provides very good solvent properties, very fast evaporation and moderate toxicity.
- Low cost
- Cleans with little or no wiping
- Fast Evaporation
- Flammable

IMS Citrus-50 PLUS is a unique blend of our proven, natural citrus solvent and an FDA grade petroleum-based solvent.
- Low flammabiliy
- Helps avoid the price fluctuations that can be found in pure citrus cleaners
- Cleans with minimal wiping, saves labor time
-
Time to Purge!
January 7, 2024
Purging compounds help maintain the quality, efficiency, and longevity of the molding process and equipment. Modern purging compounds are designed to be easy to use, often requiring no special equipment or procedures. This makes them a convenient and efficient option for maintaining machine cleanliness. Here’s why you need quality purging compounds for your molding process:

Switching between different materials, such as from a darker resin to a lighter one or colors can leave residues in the machine. Purging compounds effectively clean out these residues, preventing contamination and ensuring a smooth transition. They also remove residual material or contamination in the screw, barrel, or mold which can lead to defects like streaks, black spots, or inconsistent colors in molded parts. Purging compounds remove these residues, ensuring consistent product quality.
Without effective cleaning, residue buildup can require time-intensive manual cleaning or disassembly of the machine. Using purging compounds speeds up the cleaning process, reducing downtime and increasing productivity. Residual materials, especially those prone to thermal degradation, can decompose over time and cause issues like carbon buildup. Purging compounds help prevent degradation by thoroughly cleaning the equipment after each production cycle or material change.
While purging compounds have an upfront cost, they save money in the long run by reducing waste, lowering scrap rates, and minimizing equipment maintenance and repair needs. Residue buildup can cause wear and tear on screws, barrels, and nozzles. Regular use of purging compounds minimizes this wear, extending the equipment’s lifespan and reducing maintenance costs.

In summary, purging compounds are critical in injection molding to maintain consistent product quality, optimize production efficiency, and protect equipment, ultimately reducing operational costs.
-
Plant Shutdown
Planning a shutdown for an injection molding plant is a complex task that requires careful planning and preparation to minimize downtime, maintain productivity, and ensure safety as well as ensure equipment, materials, and processes are properly secured and preserved. Here’s a structured approach to planning a smooth shutdown:
1. Plan the Shutdown Schedule
- Coordinate with Departments: Plan with all relevant departments (maintenance, quality control, logistics) to ensure smooth transition. If possible, plan for sequential shutdowns to avoid a full-plant shutdown. Determine which equipment and areas will be affected. Notify Staff of shutdown timelines and responsibilities clearly to all employees. Identify specific reasons for the shutdown—whether it’s for maintenance, upgrades, or seasonal downtime. Also, identify key tasks or equipment that may define the overall timeline.
2. Clear Remaining Inventory:
Raw Material Management: Finalize production of in-progress parts, and clear out or ship finished goods. Plan to fulfill orders in advance to prevent customer disruptions. Use up raw materials to minimize waste. If unused materials remain, store them properly.
3. Clean and Maintain Machines:
- Cleaning and Purging: Clean each machine thoroughly, and purge the injection molding machines to remove residual material. Lubricate and grease all moving parts to prevent corrosion during downtime. Remove and store molds properly, and inspect them for wear and damage.

Purgex 
Mold Grease 
Rust Preventatives 4. Utilities and Safety Systems:
- Power Down Machines Safely: Turn off machines systematically according to the manufacturer’s shutdown procedures. If applicable, drain cooling water and compressed air lines to prevent freezing or damage. Clean molds, screws, and barrels to prevent material from hardening during the downtime. Ensure fire suppression and alarm systems remain operational and resources (staff, tools, replacement parts) are ready for both planned maintenance and unexpected repairs. Adjust inventory and supply chain requirements to account for the shutdown and restart.
5. Environmental and Safety Compliance:

Lockout/Tagout: Enforce procedures on all equipment to prevent accidental startup. Inspect equipment to ensure compliance with standards. Ensure staff is trained on shutdown and startup protocols, especially those handling hazardous materials.
Waste Disposal: Dispose of hazardous or excess materials according to environmental regulations. Confirm that safety protocols are followed, and ensure proper signage is posted for the shutdown.
6. Documentation and Final Checks:
- Inspection and Documentation: Document all shutdown procedures and perform a final inspection to confirm all equipment is secured. Provide a step-by-step guide for each shutdown task. Assign clear roles to ensure accountability, including a point person for each major component (machinery, safety, scheduling). Schedule preventive maintenance tasks for the shutdown period, such as inspecting equipment and infrastructure. Ensure the plant is secure, with restricted access as necessary. If possible, set up remote monitoring for critical systems.
7. Plan for the Startup Phase
- Inspect and test all equipment to ensure it’s fully functional and safe. Run trial molds to confirm correct operation and quality standards. Calibrate machinery and quality inspection tools to ensure consistent production. Notify all teams of the restart schedule. If necessary, inform clients of potential impacts on production schedules. Plan for unexpected issues, such as equipment failure or supplier delays, by scheduling buffer time or backup resources.
8. Post-Shutdown Review
- Conduct a review to assess the shutdown’s effectiveness, documenting any issues or insights for future shutdown planning. A well-prepared shutdown process ensures maintenance, safety, and efficient restart, minimizing impact on production and quality.
Blog, Components, Energy Savings, Extrusion, Fittings, Manifolds & Hose, Gate Cutters & Trimmers, Heaters & Temperature Control, Industrial Equipment, Injection Molding, Material Handling, Mold Care, Mold Release & Maintenance, Molding Supplies, Nozzles & Nozzle Tips, Plastics, Post-Production Equipment, Safety Supplies, Screw Tips, Screws & Barrels, Tech Tips, Uncategorized -
Prepare Your Shop for Winter

Preparing an injection molding shop for the cold winter months requires both practical and strategic measures to ensure the machines and processes run efficiently despite the drop in temperature. Here are suggestions of actions you can take now.
1. Temperature Control
Inspect doors, windows, and walls for drafts and seal any gaps to retain heat. Ensure your heating system is serviced and functioning properly to maintain a consistent temperature in the shop. Consider installing space heaters or localized heating systems to keep machines at optimal operating temperatures. Follow all safety precautions when using space heaters.
2. Equipment Preparation
Switch to cold-weather lubricants for machines, as standard lubricants can thicken in colder temperatures, causing equipment to run less efficiently. Give machines extra warm-up time before starting production, especially on colder days. Cold temperatures can cause hydraulic fluids to become more viscous. Inspect hydraulic systems for leaks and service them to ensure they are ready for colder conditions.
3. Material Handling & Storage

Store raw materials in climate-controlled areas to prevent moisture absorption and changes in physical properties. Resins absorb moisture during colder months, so ensure proper drying before molding to avoid defects in the final product. Materials should be at a consistent temperature when fed into the machines. Cold materials can affect molding quality and cycle times.
4. Air System Maintenance
Air compressors should be checked for any signs of moisture accumulation, as cold air increases the chances of condensation, which can lead to freezing and damage. Ensure air dryers and filters are functioning properly to remove moisture from compressed air systems. If the relative humidity is low, have products on had to detect and neutralize static electricity.
5. Cooling Systems
Review coolant systems for proper antifreeze levels, especially if the system uses water-based coolants. Insulate coolant lines and pipes that are exposed to cold air to prevent freezing and bursting. Ensure that mold heating systems are working efficiently, as cooling the molds too quickly due to cold temperatures can lead to part defects.
6. Energy Efficiency

Consider insulating machines to retain heat, and use programmable thermostats to manage shop heating and cooling efficiently. Close doors quickly after deliveries and use barriers or air curtains to minimize heat loss. Contain and conserve barrel heat with IMS Exclusive UniVest® Barrel Insulation System. Barrel bands promote faster machine start-up and stop barrel heat fluctuations
7. Employee Safety & Comfort
Ensure employees have access to warm clothing and personal protective equipment suited for cold conditions. With snow and ice outside, ensure walkways are cleared and non-slip mats are installed at entry points to prevent accidents.
8. Planning for Delays
Anticipate delays in deliveries due to winter weather and stock up on essential materials and spare parts to minimize downtime. By taking these steps, you can help ensure that your injection molding shop operates smoothly and efficiently during the cold winter months.
Blog, Components, Gate Cutters & Trimmers, Heaters & Temperature Control, Industrial Equipment, Injection Molding, Material Handling, Mold Care, Mold Release & Maintenance, Molding Supplies, Nozzles & Nozzle Tips, Plastics, Post-Production Equipment, Production Equipment, Safety Supplies, Static Eliminating, Tech Tips, Uncategorized -
New Injection Press Setup
(This is intended to be a starting point, you may find more is required depending on your process. We want to hear from you! After you read this let us your process!)
Setting up a new injection molding machine is a critical process that involves several steps to ensure efficient and safe operation. Before setup, get as many details of the job and the machine as possible. An idle machine is a waste of time and money. Try set your new machine up to handle as many different molds as possible. Once properly setup, it’s crucial to routinely monitor the equipment to catch any issues early and keep production running smoothly.
In your initial preparation, be sure to completely review the manual. Familiarize yourself with the specifics to understand its functions, controls, and safety features. Select the proper location to ensure the machine is placed in a well-ventilated, stable, and clean environment. The location should allow easy access for maintenance and operation. Arrange for proper venting for noxious fumes from resin like PVC, acetal, fluoropolymers, etc.
Also Consider:
- Space needed for Auxiliary Machinery and Equipment, Hot-Runner Temperature Controllers, Resin Bins and a Work Table
- Cart for processor supplies, such as mold rust preventatives, ejector-pin lubricant, brass tools, purge bucket, ejector – knockout bars, propane torch, nozzles, and sprue-bushing, radius gauges, etc.
- Special equipment to inspect, assemble, label, trim, box etc.
- Quality-control equipment
- Obtain proper number and size of Mold Clamps, Bolts and Spacers.
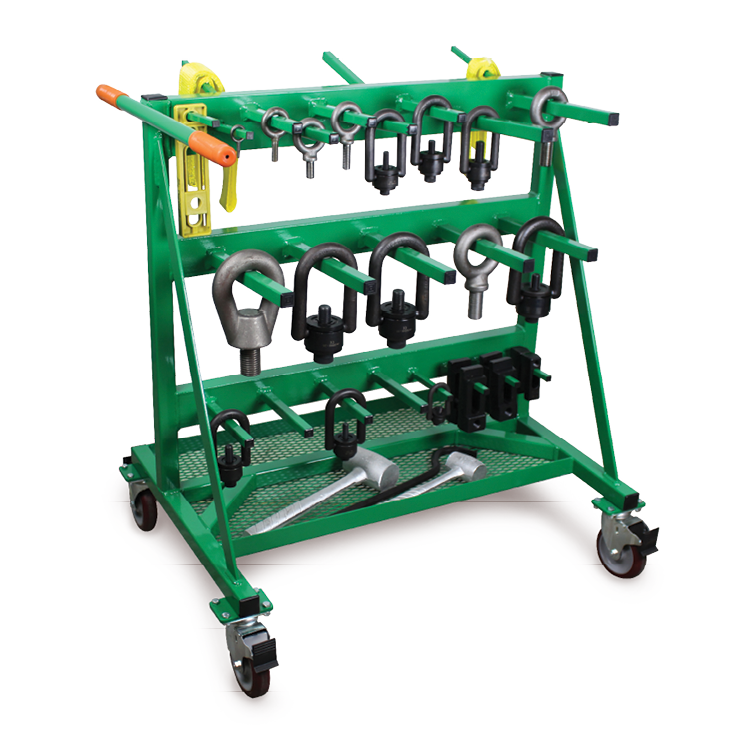

Hoist Ring Rack – Mobile Hoist Ring, Eyebolt, Lifting And Rigging Utility Cart
Mold Maintenance And Set-Up Cart – Ready for your specific needs
Keep available floor space near the machine that will see routine maintenance or troubleshooting. If you must put something near the control cabinet, make sure everything has quick disconnects and on wheels for easy access. Verify that the machine is connected to the correct power supply. Ensure that voltage, frequency, and phase match the machine’s specifications. Install safety guards and ensure all emergency stop buttons are functional. Provide training to operators on safety protocols.
Order and set up mold-temperature controllers with gpm (lpm) flow monitoring and pressure sensing on inlet and outlet. Order and install appropriate cooling for machine, mold and auxiliaries. Remember all lines to the mold must carry the same temperature and volume of water for every run. That is, each machine must have a mechanism (usually a mold-temperature controller with flow meters and pressure gauges to push the same volume and temperature of cooling/heating agent every time the mold is in the press.
Machine Installation
Use a level to ensure the machine is perfectly leveled. Uneven leveling can cause issues with part quality and machine wear. Also, check the floor’s weight rating can handle the new machine and accessories. After connecting utilities like electricity, water for cooling, and compressed air; check for any leaks or irregularities. Power on the machine and configure the control system as per the requirements. Load any necessary software.
Mold Installation, Setup and Calibration
Using appropriate lifting tools; align and fasten the mold into the machine. Adjust the clamping force to match the mold’s specifications. Over or under clamping can damage the mold or result in defective parts. Connect the cooling lines and ensure that water flows correctly through all channels. Input injection pressure, temperature, and cycle time, based on the material and mold requirements. Run the machine without material to check for smooth operation. Prepare the raw material by drying them if necessary to avoid moisture-related defects. Fill the hopper with the raw material. Ensure the material is clean and free of contaminants (tramp metal).

Trial Runs & Quality Control
Run a few cycles to fine-tune the process parameters. Perform a thorough inspection of the first few molded parts for dimensions, surface finish, and any defects then make necessary adjustments. Compare them against the specifications. Record the final process parameters once optimal settings are achieved. This documentation will be useful for future reference. Continuously monitor the process and adjust the settings for optimal performance. This includes adjusting the injection speed, holding pressure, and cooling time.
Check Power Requirements:
- Motor
- Heater Bands
- Temperature Controllers
- Hot-Runner Controllers
- Heaters
- Dryers
- Loaders
- Conveyors
Check Routes and Connections:
- Power
- Water
- Chiller Lines
- Drains
Be Sure to have appropriate:
- Injection End Components
- Manifolds & Fittings
- Hose
- Tubing & Clamps
- Inlet/Outlet Pressure Gauges
- Mold Waterline Descaler (critical to keep channels within the mold through which coolant flows to control the temperature during the molding process clean and effective) https://imscompany.blog/2023/03/02/ims-lime-buster/
- Purging Compounds – process of cleaning the machine, barrel, screw, and nozzles, of any residual material to prevent contamination, defects, or color mixing in the next production run. https://imscompany.blog/2022/08/17/purgex-purging-compounds/
- Safety Supplies
- Mold Protection – Mold Release and Mold Cleaner and Rust Prevention
Final Checks
Perform a final safety check to ensure all guards are in place and the machine is operating safely. Ensure that the operators are fully trained on the machine’s operation, safety procedures, and troubleshooting techniques. Set up a maintenance schedule to ensure the machine operates efficiently over time.
Blog, Chemicals, Components, Custom Project, Extrusion, Fittings, Manifolds & Hose, Gate Cutters & Trimmers, Heaters & Temperature Control, Industrial Equipment, Injection Molding, Material Handling, Mold Care, Mold Release & Maintenance, Molding Supplies, Nozzles & Nozzle Tips, Plastics, Post-Production Equipment, Production Equipment, Safety Supplies, Screw Tips, Screws & Barrels, Static Eliminating, Tech Tips, Uncategorized -
D-limonene

D-limonene, also known as citrus terpenes, is a chemical compound that can be found in the peels of citrus fruits like oranges, lemons, and limes. It has many uses, including as a solvent in cleaning agents, an aroma in furniture polish, a dietary supplement, and a flavoring in food and beverages. Every bit of the orange is used in production. After the orange is juiced the leftover peel is used to create orange extract and d-limonene.
Over the past few years producers are reducing the number of orange trees as their land becomes more valuable for other uses. The shift from orange cultivation to other land uses due to increasing land values is a significant issue in citrus-growing regions, including Brazil. Another issue, citrus greening, also known as Huanglongbing (HLB), and Yellow Dragon Disease (YDD) are both severe citrus diseases that have significantly impacted citrus production globally for almost 2 decades.

When you pair the long-term production decline with the chemical industry trying to move to greener, bio-based solutions like d-limonene your faced with a volatile situation. If you’re facing a shortage of d-limonene, here are a few strategies to consider:
- Alternative Solvents: Explore substitute d-limonene solvents for your process. For injection molding, solvents with similar properties might work, but it’s important to test first.
- Supplier Diversification: Look for alternative suppliers who have d-limonene available or who provide it in the quantity you need.
- Adjust Formulations: If possible, adjust your material formulations to reduce or eliminate the need for d-limonene.
- Inventory Management: Consider managing your inventory more carefully and planning your production schedules to make the most of what you have.
- Industry Collaboration: Reach out to industry groups to see if others are experiencing similar issues and if there are any shared solutions or resources available.
- Consult with Experts: Engage with experts or consultants who specialize in injection molding or materials science. They may provide insights or solutions tailored to your specific situation.
Mold Cleaners
Aerosol mold cleaners are commonly used in the injection molding industry to maintain and clean molds efficiently. These cleaners allow for easy application and targeted spraying to remove contaminants like dirt, grease, resin buildup, and other residues that accumulate. These cleaners are essential for maintaining the longevity and efficiency of molds in injection molding operations, ensuring consistent product quality and reducing downtime.
IMS Company Offers a Series of A Natural, Biodegradable Cleaners
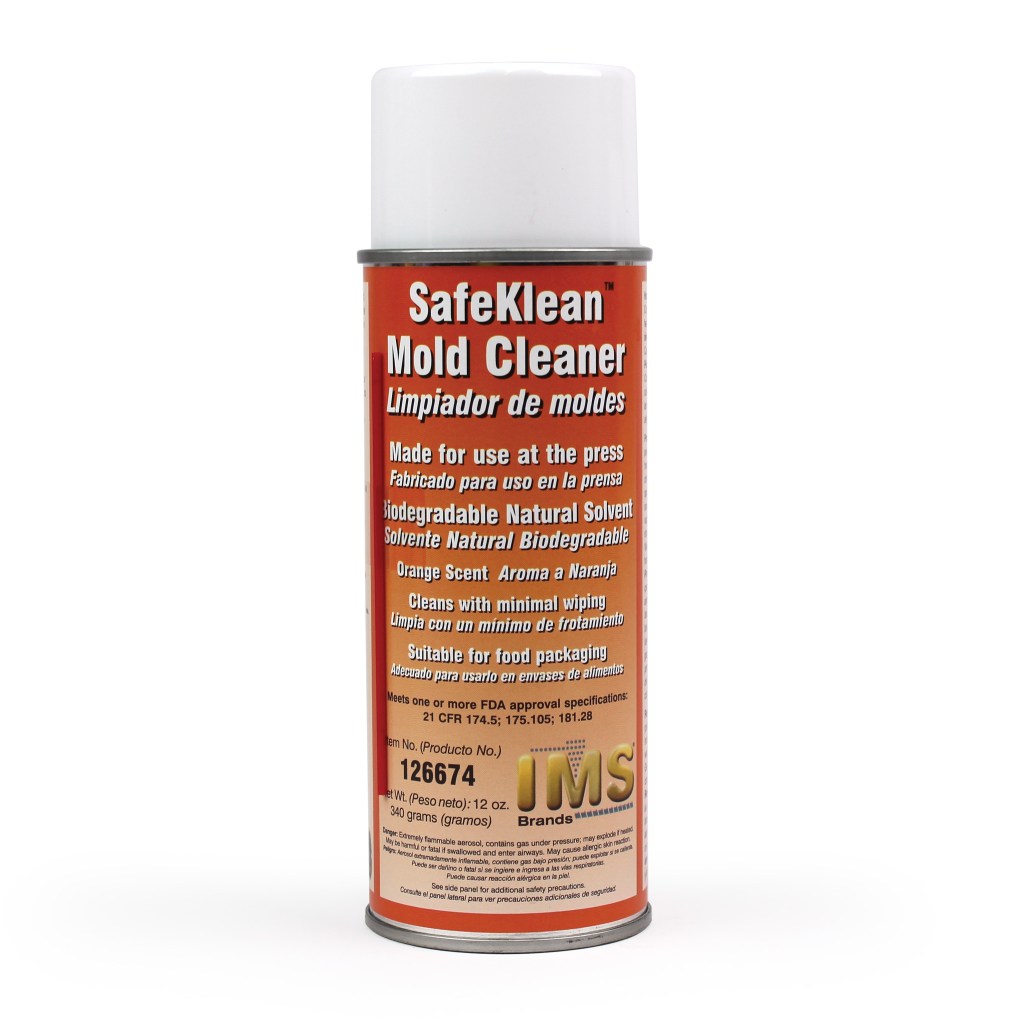


IMS SafeKlean™
Most Environmentally Friendly Mold CleanerFDA rated GRAS — 21 CFR 182.60
Hydro Carbon based propellant
Lowest Flammability
Lowest Toxicity
Cleans with minimal wiping, saves labor time
Citrus Spray
Pure, all-natural cleaner with good solvent abilityFDA rated GRAS — 21 CFR 182.60
Hydro Carbon based propellant
Highly Flammable
Lowest Toxicity
Cleans with minimal wiping, saves labor time
Citrus Spray
Helps avoid citrus
price fluctuationsFDA rated 21 CFR 172.884 and 178.3650
Carbon Dioxide propellant
Flammable
Low Toxicity
Cleans with minimal wiping, saves labor time
-
Rust Prevention
8/14/2024
Rust prevention in injection molding is crucial for maintaining the longevity and performance of molds. Rust can cause defects in the molded parts, affect the accuracy of the mold, and lead to costly maintenance.
Whenever possible, use high quality materials such as stainless steel or other rust-resistant alloys for mold construction. Apply protective coatings or surface treatments like nitriding or chrome plating to enhance resistance to rust. Below are some effective types of coatings and treatments:
- Chromium Plating is a hard, corrosion-resistant coating applied to the surface of the mold. It provides excellent resistance to rust and wear, enhances durability and finish. This plating is ideal for molds exposed to aggressive environments.
- Nickel Plating offers good corrosion resistance and improved hardness. It can be used alone or as a base layer for other coatings. Suitable for molds requiring a combination of corrosion and wear resistance.
- PVD (Physical Vapor Deposition) Coatings is a process where thin layers of material (like titanium nitride or zirconium) are deposited onto the mold surface. They are used for high-precision molds and provide high hardness, low friction, and excellent corrosion resistance.
- Heat treatments such as nitriding or carburizing that harden the steel surface. They improve hardness and resistance to rust and wear. Suitable for molds where increased surface hardness and corrosion resistance are required.
- Ceramic Coatings offers excellent corrosion and wear resistance, high thermal stability. Ideal for molds exposed to high temperatures or aggressive chemicals.
- Anti-Corrosion Sprays or wipes containing rust inhibitors applied directly to the mold surface are easy to apply, provides temporary protection against rust. Used for short-term protection or as part of regular maintenance routines.
- Dry Powder Coatings applied electrostatically and then cured under heat. Provides a tough, durable finish with good corrosion resistance. Suitable for molds that are less frequently used or in environments where they are exposed to corrosive substances.
- Rust-Preventive Oils and Greases applied to the mold surface to form a protective layer. Provides effective, temporary protection against rust and corrosion. Commonly used for short-term storage or when the mold is not in use.
IMS Company’s Rust Preventative sprays create a protective layer on the mold surfaces, preventing rust and corrosion due to exposure to moisture or chemicals. They extend the life of the molds and simplify the maintenance of molds by keeping them in good condition and minimizing downtime.
Types of Rust Preventative Sprays
- Oil-Based Sprays: These sprays provide a thick, protective layer that is effective against moisture. They are often used for long-term storage.
- Water-Based Sprays: These are less greasy and can be more suitable for environments where cleanliness is a priority. They often contain additives to improve their protective qualities.
- Dry Film Lubricants: These sprays leave a dry film that can provide a protective barrier without being greasy, which is useful for high-precision molds.
Best Practices for Applying Coatings:
Ensure the mold surface is clean and free from contaminants before applying any coating. Always follow the manufacturer’s guidelines for applying and curing the coating to ensure optimal performance. Regularly inspect the coating for any signs of wear or damage and reapply as needed. Choosing the right rust preventative coating depends on factors such as the specific application of the mold, exposure conditions, and budget constraints. Combining these coatings with proper maintenance practices will greatly enhance the longevity and performance of injection molds.

- Regular cleaning of the molds to remove contaminants that can contribute to rust formation. Use non-abrasive cleaners that won’t damage the mold surface.
- Ensure that the mold is thoroughly dried after cleaning or exposure to water. Moisture can accelerate rusting. Employ desiccants or drying agents in storage areas to reduce humidity.
- Use rust inhibitors or anti-corrosion sprays on mold surfaces when they are not in use. Lubricate moving parts and components to create a protective barrier against moisture.
- Maintain a stable, low-humidity environment in the molding area and storage. Use dehumidifiers to control moisture levels in the workshop.
- Conduct regular inspections for early signs of rust and address them promptly. Follow a preventive maintenance schedule to address potential issues before they lead to rust.
- Avoid exposing molds to unnecessary moisture or harsh conditions during handling and transportation.
- Use protective covers or wraps when storing molds for extended periods. Store molds in a dry, temperature-controlled environment.
Implementing these practices will help in reducing the risk of rust and prolonging the lifespan of your injection molds.
